> ## Documentation Index
> Fetch the complete documentation index at: https://docs.siro.ai/llms.txt
> Use this file to discover all available pages before exploring further.
# Dealertrack
> Authorize Siro in Dealertrack Opentrack as a certified vendor for each required data method.
Welcome! This guide walks you through authorizing Siro's access to your Dealertrack DMS via Opentrack. You will add Siro as a certified vendor for each required data method – the process takes around 10 minutes.
If you have any questions while navigating Dealertrack, reach out to your Siro Customer Success Manager. Once you have completed the steps below, your CSM will finalize the connection on Siro's end.
## What this integration enables
Once connected, Siro syncs the following data from your Dealertrack DMS in near real-time:
* **Deal records** – VIN, stock number, sale date, deal type, and sale status, used to link recordings to F\&I deals
* **Repair orders** – RO number, advisor, labor and parts totals, used to link service advisor recordings to open or closed ROs
* **Service appointments** – scheduled time, advisor, VIN, and reason for visit, used to surface appointment reminders ahead of a visit
* **Customer records** – name, phone, and email for customer context on recordings
* **Employee records** – used to automatically match Dealertrack employees to their Siro user accounts
## Quick checklist
Before you start, make sure you have:
* Access to your **Dealertrack DMS** – your user account must have Opentrack access enabled. If you are unsure, contact your DMS administrator before starting.
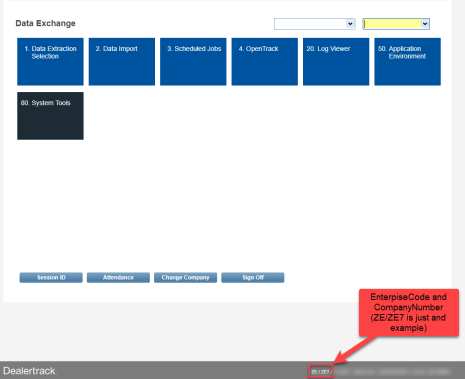
* Your **DMS Enterprise Code** and **Company Code** – find these in the **bottom right-hand corner** of your DMS screen. Your CSM will need these to complete the setup on their end.
 ## Steps
**1. Open Opentrack**\
In the top menu of your Dealertrack DMS, click **More**, then **Data Exchange**, and select **Opentrack**. This opens the **Active Methods** list screen.
**2. Create a new vendor**\
From the Active Methods list, click **Add** to start a new entry. The **Vendor Access definition** screen will open – you will choose the **Method**, select **Siro** as the **Vendor**, and set the access dates in the next step.
**3. Define the vendor settings**
* **Method** – Click the **Method** hyperlink. Select each of the available methods individually, then click **Ok**:
* Customers
* Deals
* Service
* **Vendor** – Click the **Vendor** hyperlink. Select **Siro** from the Certified Vendors list, then click **Ok**.
* **Access begins** – Click the calendar and select today's date, or the date you would like Siro's access to begin.
* **Access ends** – Leave this field **blank** unless your CSM has told you otherwise.
Click **Ok** to save.
Once all methods have been added to your Siro integration, let your CSM know and share your Enterprise Code and Company Code with them. They will finalize the connection on Siro's end – no further action needed from you.
## What happens next
Your Siro CSM will configure the integration on Siro's end once they have your Enterprise Code and Company Code. They will confirm with you once data is flowing.
> **Multiple locations?** Each dealership rooftop requires its own separate vendor authorization in Dealertrack Opentrack. If you have multiple locations, repeat the steps above for each one and share the Enterprise Code and Company Code for each location with your CSM.
## Questions?
Contact your Siro Customer Success Manager directly – they are here to help every step of the way.
## Steps
**1. Open Opentrack**\
In the top menu of your Dealertrack DMS, click **More**, then **Data Exchange**, and select **Opentrack**. This opens the **Active Methods** list screen.
**2. Create a new vendor**\
From the Active Methods list, click **Add** to start a new entry. The **Vendor Access definition** screen will open – you will choose the **Method**, select **Siro** as the **Vendor**, and set the access dates in the next step.
**3. Define the vendor settings**
* **Method** – Click the **Method** hyperlink. Select each of the available methods individually, then click **Ok**:
* Customers
* Deals
* Service
* **Vendor** – Click the **Vendor** hyperlink. Select **Siro** from the Certified Vendors list, then click **Ok**.
* **Access begins** – Click the calendar and select today's date, or the date you would like Siro's access to begin.
* **Access ends** – Leave this field **blank** unless your CSM has told you otherwise.
Click **Ok** to save.
Once all methods have been added to your Siro integration, let your CSM know and share your Enterprise Code and Company Code with them. They will finalize the connection on Siro's end – no further action needed from you.
## What happens next
Your Siro CSM will configure the integration on Siro's end once they have your Enterprise Code and Company Code. They will confirm with you once data is flowing.
> **Multiple locations?** Each dealership rooftop requires its own separate vendor authorization in Dealertrack Opentrack. If you have multiple locations, repeat the steps above for each one and share the Enterprise Code and Company Code for each location with your CSM.
## Questions?
Contact your Siro Customer Success Manager directly – they are here to help every step of the way.